the evaluation for the tutoreal project
Monday 21 March 2011
Time Table
With the utter failure of shotgun, Jared has turned round and announced that we can use other means to show a timetable and established a sort of time and project management.
-----------
I only have two weeks left of this project, hence the scope of the table. On the upside it gives me the opportunity to show each day in detail. On the downside I can't make an accurate graph to show any improvment.
I have already done most of the work for the tutorial and have split the remaining project into manageable parts for the coming week. I've taken note of what days I have meeting or I am too busy to spend at college.
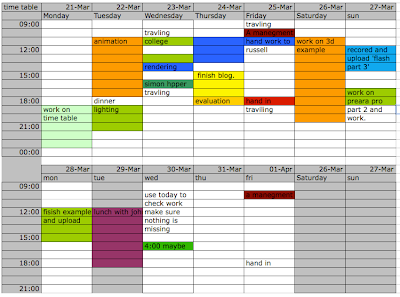
I will update the post with a new timetable underneath at the end of the week if or when I make changes for comparison.
p.s. Why did I put 'dinner' in one of the slots? Do people really need to know that?
-----------
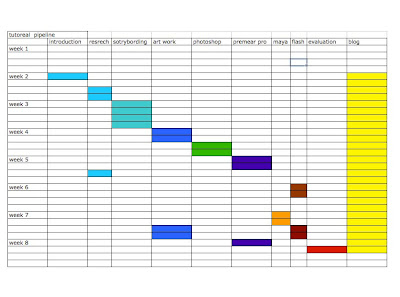
i have now made a pipeline showing what order of subject i spent my time working on. as each part of my work was done i added it strait into my blog
-----------
I only have two weeks left of this project, hence the scope of the table. On the upside it gives me the opportunity to show each day in detail. On the downside I can't make an accurate graph to show any improvment.
I have already done most of the work for the tutorial and have split the remaining project into manageable parts for the coming week. I've taken note of what days I have meeting or I am too busy to spend at college.
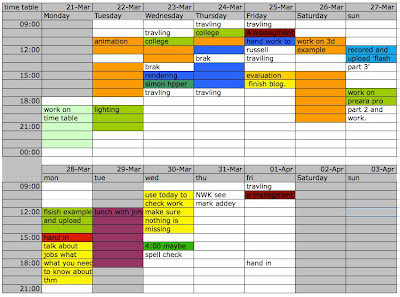
updated on the 21,3,2011

updated on the 25,3,2011

I will update the post with a new timetable underneath at the end of the week if or when I make changes for comparison.
p.s. Why did I put 'dinner' in one of the slots? Do people really need to know that?
-----------
i have now made a pipeline showing what order of subject i spent my time working on. as each part of my work was done i added it strait into my blog

adding the animation back into premea pro
the animation we have made is going to be added back into
-----------
video has been removed for the time being
the video has been deleted i dident like how i ended it.
but all it was is how to add the footage back into premea pro with file/inport. the newist footage bring it back into the stage and then exsport/media. with sound as a youtube 1080p will do.
once that is done it'll open media encoder, chose were you want to send the file and then click start queue.
and we are done.
thanks for viewing and hope this had helped
Saturday 19 March 2011
flash pt 3
this post will be used to exsplain that now we have footage in flash, the uses of it.
--------
this is the hardist part but the most inpropret.
i will be demstrating useing flash for frame by frame animation.
--------
this is the hardist part but the most inpropret.
i will be demstrating useing flash for frame by frame animation.
Wednesday 16 March 2011
Maya and Flash pt 2
Second post. We start work on the Flash side of this project.
-----------
I am using Flash CS4.
We'll start by using the footage we made with Maya. Open Flash and change the setting to 25 frames and the size of the canvass ____________. We need to do this first so the footage will run at the same time.
Then try to import the footage into Flash by going to file and import to libary. Try to bring the video straight in.
When we do this, we get a window giving us options of how we want to bring the footage in.
We now go back into Flash and go back into 'import to library' and this time chose the new file. Click 'ok continue' a few times and we have imported the video the way we need it for the tracing to work.
-----------
I am using Flash CS4.
We'll start by using the footage we made with Maya. Open Flash and change the setting to 25 frames and the size of the canvass ____________. We need to do this first so the footage will run at the same time.
Then try to import the footage into Flash by going to file and import to libary. Try to bring the video straight in.
When we do this, we get a window giving us options of how we want to bring the footage in.
- load external video with playback component
- embed FLV in SWF and play in timeline (the one we want)
- import as mobile device - video bundled in SWF
We now go back into Flash and go back into 'import to library' and this time chose the new file. Click 'ok continue' a few times and we have imported the video the way we need it for the tracing to work.
Sunday 27 February 2011
Maya and Flash pt 1
Some shots are too complicated to be shown in 2d and even After Effects can't get everything right.
You going to have to sooner or later use 3d motion to get your point across. Maya is a good solution to this.
------
I'm only giving tips in this video. I'm not going to concentrate on any particular background or scene.
I'm working on my own model and expect that I can only really safely explain some of the basic modeling and animatic the camera shots.
-----
Basic modeling:
When you open Maya you can see the polygons options on the shelf.
Animating a camera and moving it:
We can easily make a camera by going to 'create' and 'camera'.
Moving a camera: click on the camera and click 'S' on the keyboard. This will make a keyframe on the time-line. Move the slider along the timeline and change the camera along the scene and click 's' again and create another keyframe. This gives you the Maya equivalent of a 'tween' (the filled animation between two key-frames).
Working In Premier Pro
We have our images - now we are going to have to set them to time.
-------
Premier Pro,
Open Premier Pro.
Create a new project, name it (name)_animatic_001.
We take the png files we made and add them into the new project by dragging them into the library on the left.
Find any sound files you want, voices or extras and also add them.
N.B. Keep it organised in the library by using files and naming them.
Drop the images as well as any sound you're using into the timeline.
Strech the background so it fits the screen on the top left.
You should keep the backgound on the bottom layer and the images of your character on top in the time-line. This is why we cut them out. We can now move them freely around the screen over the background and animate them easily.
We animate them by clicking on the image and opening the motion box. We get all the options we need to animate;
This should be enough to get you started in Premier Pro.
-------
Premier Pro,
Open Premier Pro.
Create a new project, name it (name)_animatic_001.
We take the png files we made and add them into the new project by dragging them into the library on the left.
Find any sound files you want, voices or extras and also add them.
N.B. Keep it organised in the library by using files and naming them.
Drop the images as well as any sound you're using into the timeline.
Strech the background so it fits the screen on the top left.
You should keep the backgound on the bottom layer and the images of your character on top in the time-line. This is why we cut them out. We can now move them freely around the screen over the background and animate them easily.
We animate them by clicking on the image and opening the motion box. We get all the options we need to animate;
- postion: where the image or video is on the screen
- size: how big the image or video is on screen
- rotation: turing the image or video by the pivot point
- anchor point: the pivot point on the image
- opacity: degree of transparency
This should be enough to get you started in Premier Pro.
Subscribe to:
Posts (Atom)